[Excel] I want to limit browsing and editing by applying a password to the material!Tech that shares materials that are in trouble to be seen other than a specific person in Excel
I want to apply a password to the book so that only a specific person can view and edit it!
Have you ever wanted to limit your access so that only a specific employee could not browse or edit this information except for a specific employee?
If you set a password in the Excel book, only those who know the password will be able to browse and edit files.
This time, I will explain how to set a password in the Excel book so that only a specific person can open a book and browse and edit it.It also explains how to browse books but limit writing (allow only those who know the password to write).
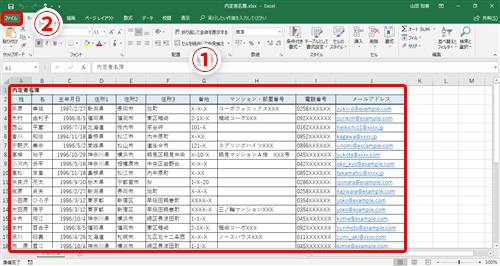
As an example, let's do it using the informal list (①).This list is a password in the book, assuming information that general employees do not want to see.By doing so, only employees who know the password will open this book.
First, click the File tab (②).
The [Information] screen is displayed.Click [Book Protection] (③) to select [Encrypted using password] (④) from the menu displayed.
The [Cryptence of Document] dialog box is displayed. Enter your password (⑤).Please note that once you forget the password you set, you will not be able to open the book.Passwords are distinguished between uppercase and lowercase letters.
When you can enter your password, click [OK] (⑥).
Then, since the [Confirm Password] dialog box is displayed, the password is re -entered, so re -enter the password you entered earlier (⑦).
Click [OK] (⑧) to close the dialog box.
When you return to the [Information] screen, the [Book Protection] part becomes yellow, and the phrase "Password is required to open this book" (⑨).The password setting is now complete.
Click [Save overwrite] (⑩) to save the book.
Return to the sheet and click the [×] button (⑪) to close the book.
If you try to open the book again, the following dialog box will be displayed (⑫), and you will not be able to open without entering the password.
Only those who know the password for browsing and editing the book can open and edit only those who know the password.

You can allow browsing of the book, but you can restrict your writing (only for those who know the password to write) (here is "writing" means changing the contents of the book and overwriting.increase).
In the following quotation (①), let's set a password to write in this book, although it is okay for general employees to view it, but it is difficult to change the content.
First, click the File tab (②).
The [Information] screen is displayed. Click [Save with name] (③).
The [Save it with name] screen is displayed. Check the place to save (here, save on [Desktop] in [This PC]) (④) and click [Other Options] (⑤).
The Dialog box is displayed.Here, "quotation.Since the overwrite is saved as it is in XLSX, the file name is not changed, and click [Tool] (⑥) → [General Options] (⑦).
The [General Options] dialog box is displayed. Enter the password in the [Write Password] column (⑧).Nothing is entered in the [Read Password] column (⑨).By doing so, reading (browsing) is allowed by anyone, and writing (overwriting) cannot be done unless you enter your password.
When you can enter the password, click [OK] (⑩).
Then, the [Confirm Password] dialog box is displayed. Enter the password you entered earlier (⑪) and click [OK] (⑫).
Return to the [Save with name] dialog box and click Save (⑬).
After this, a dialog box asking if you can overwrite and save is displayed, but click OK and proceed to the next.
Return to the sheet and click the [×] button (⑭) to close the book.
If you try to open the book again, the following dialog box will be displayed (⑮).If you want to write in the book, you have to enter your password.If you just browse, you can open the book by clicking [Read only] (⑯), but you cannot overwrite.However, you can open the book only for reading and save it with another name.
To cancel the password, do the screen where the password is set (in the case of technique 1, the Cryptence of Document] dialog box, and in the case of technique 2, the General Options dialog box).Here, as described in the Examples of the Document encryption dialog box, it can be released in the same operation in the [General Options] dialog box.
Refer to the above procedure, display the Document Cryptography dialog box.The password input field shows the entered password (①).
Here, the input password is deleted (②).In other words, the [Password] column is blank.
Click [OK] (③) to close the dialog box.
After returning to the [Information] screen, click [Save overwrite] to save the book.The access restriction by password is now canceled.
This time, I explained how to set a password in the Excel book so that only a specific person can access the book.
If you set and manage your password in this way, there is no need to worry about being seen by people without access authority or editing a book to those who are not related to business.However, if you forget your password, you will not be able to restore it, so be careful with it.