Use a Windows 365 cloud PC from a dedicated app for Windows, Mac, or iPad
"Windows 365" launched by Microsoft in August 2021 is a full-fledged remote desktop service that allows you to use a Windows environment built on the cloud (hereinafter referred to as a cloud PC) from anywhere. . Last time, I introduced how to access the cloud PC from a web browser, but the cloud PC can also be accessed using a dedicated application.
Dedicated apps are available for Windows, Mac, iOS/iPadOS, and Android. This time, we will introduce how to use the cloud PC with Windows, Mac, and iPad apps.
Using the Cloud PC with the Windows Remote Desktop App
First, let's access the cloud PC using the Windows version of the Remote Desktop App. Access the Windows 365 portal screen and click the down arrow icon in the upper left, or click the "Download Remote Desktop" menu in "Quick Actions".
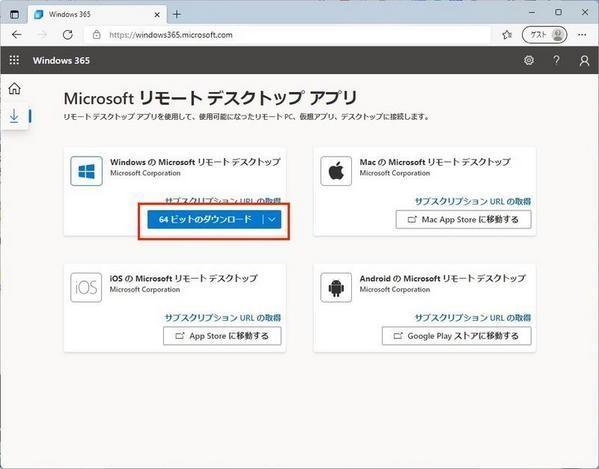
You will see a page called "Microsoft Remote Desktop App" as shown below.
Here, if you click the [64-bit Download] button for "Microsoft Remote Desktop for Windows", you can download the application for connecting to the remote desktop.

When you run the downloaded file, the installer will start, so follow the instructions on the screen to install. When the installation is completed, the remote desktop application will be launched as follows.
At first, nothing such as cloud PC to connect to is registered. Here, if you click the [Register by URL] button, a field for entering the URL will be displayed on the right as shown below.
Enter the URL of the workspace where the Windows 365 cloud PC is deployed in this "Email or workspace URL". You can find your workspace URL in the Windows 365 portal. On the download page of the remote desktop app earlier, you should see a link called "Get Subscription URL" as shown below.
When you click this link, the URL will be displayed in a dialog as shown below.
This will be the "workspace URL" that you will register in the remote desktop app. If you return to the remote desktop app and successfully register the workspace URL, you should see the Windows 365 cloud PC as shown below. In this example, only one cloud PC is created, but even if there are multiple PCs, they are all displayed here.
Double-click the icon of the cloud PC you want to use. You will be prompted to enter your credentials, so enter the account and password you created when setting up your cloud PC and click OK.
Once authentication is successful, the desktop of the cloud PC will be displayed via the remote desktop app (not the web browser).
In the menu at the top, you can switch between full screen display and window display. You can also stop using the cloud PC by clicking the x icon on the right side of this menu.
The following figure is an example of window display. You can see how the cloud PC is accessed as a native application instead of a web browser.