Let's use the "template" provided by ASCII Power Automate
Hello, this is Noriko Matsumoto from Microsoft MVP (Azure / Business Applications). In this fourth installment of this series, we will introduce you to the "templates" of Power Automate.
1. Let's use Power Automate for free
"Power Apps Developer Plan" website
Before we get into the main topic of templates, here are a few things you need to know to learn Power Automate.
First of all, if you want to learn Power Automate, if you have a work or school email address, you can use it for free by signing up from the "Power Apps Developer Plan" site. Formerly known as the "Power Apps Community Plan," it was renamed to the "Power Apps Developer Plan" in May 2021 to meet the needs of developers.
This developer plan can be used permanently (without time limit), but it is positioned as a "free environment for personal learning", and the above sign-up page also says "For verification before publication". You will be limited to building and testing your app. "(There is also a capacity limit). Be sure to purchase an appropriate license when publishing it within the company and performing actual operation.
● Reference: Power Apps Developer Plan
2. Power Automate process automation type
I also learned that there are two types of process automation functions (process automation functions) in Power Automate: DPA (Digital Process Automation) "cloud flow" and RPA (Robotic Process Automation) "desktop flow". Let's go.
Power Automate's "Cloud Flow" feature
Cloud flow is a function that connects cloud services (SaaS) using a connector on a web browser to create a workflow consisting of triggers and actions. What is commonly referred to as "Power Automate" refers to this cloud flow.
Power Automate's "Desktop Flow" feature
Another desktop flow is the RPA feature, formerly known as the "UI flow". Use "Power Automate Desktop", which is a function of Power Automate, to automate the operation process of desktop applications. This is called "Power Automate Desktop (commonly known as PAD)" to distinguish it from the cloud flow (Power Automate) mentioned above.
3. What is a template?
Power Automate template
Now let's talk about templates. The template introduced this time is currently provided only for Cloud Flow (Power Automate).
Power Automate templates provide a “template” for workflows created by Microsoft, centered on popular connectors that are frequently used. You can create a workflow from a template and use it as is, or you can change / add / delete template triggers and actions to create your own workflow.
4. How to find a template
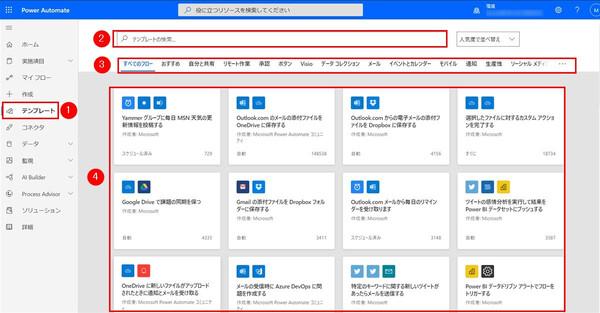
How to find a template

The Power Automate home screen shows the template, but it's part of the whole. If you want to find what you are looking for in all templates, you can find it in the following ways.
5. Let's actually use the template
Now let's actually create a workflow using a template.
This time, I will use the template "Send OneDrive file to email". This is a workflow that emails a file uploaded to OneDrive to a pre-specified email address.
This workflow requires you to create a folder in OneDrive where you want to upload the file. I created a folder named "FlowAttachment" in advance.
5-1. Select the template you want to use
Search for the template you want to use
Open the Power Automate home screen and click "Templates" on the left menu to display the list.
Choose a template
When using the OneDrive connector for the first time with Power Automate, the login screen will be displayed. Follow the instructions on the screen to connect to OneDrive. If you can connect without problems, a green check icon will be displayed on the right side of OneDrive as shown in the figure, so click the "Continue" button.
Send OneDrive files to email
Switches to the workflow designer screen. One of the triggers and actions prepared in the template in advance is displayed.
However, since the settings such as "Folder where files are stored" and "Email destination" are not set, it will not work as a workflow as it is. We will continue to make the settings.
5-2. Trigger settings
OneDrive connector settings
First, let's set the trigger. This workflow is a mechanism that is automatically executed when a new file is uploaded to a folder on OneDrive. Then select the target folder.
First, click the folder icon in the red frame. Then specify the folder as shown in the next screen.
Select a folder on OneDrive
OneDrive connector setting completed
If you specify a folder, the folder name will be displayed as shown above. Now you have set the trigger.
5-3. Action settings
Next, set the action for the "Mail" connector. Here, set the e-mail address of the recipient to send the file, the subject of the e-mail to be sent, and the body of the e-mail.
Send email connector settings
English sentences are pre-filled in 2 and 3. This part can be rewritten, but this time I will use it as it is. The "file name" and "file path" parts are replaced with the actual file name and file path (save location).
This completes the action settings. Finally, click the "Save" button at the top right of the designer screen to save, and the workflow will be ready for use.
6. Execution result
Example of email sent
When you upload a file to the folder in the specified OneDrive, an email will be automatically sent to the specified email address.
In this way, using templates makes it easier to try automation than creating a workflow from scratch. Templates can also be a “model” for creating workflows, and you may come up with new ideas while looking at the templates. There are many templates available, so please take advantage of them.
Next time, I'll show you how to customize the workflow created using the template to your own.
■ Reference site